Let’s face it: in today’s digital age, videos are vital for connecting with your audience. Whether you’re an up-and-coming video creator, a small business owner, a marketer, or anyone wanting to progress in the video content realm, branding your video is paramount. A core aspect of video branding is logo integration – a subtle yet powerful tool for establishing brand recognition and professionalism. But how to add a logo to a video on a PC is often a question that leaves many stumped.
Don’t worry; we’ve got you covered! This guide will teach you the art of seamlessly adding logos to your videos using a resourceful tool—the Animotica video editor. It’s more than just a solution; it’s a comprehensive journey that empowers you to optimal video watermarking on PC, where we’ll navigate the nuances of logo overlays together.
Remember, your logo is a visual storyteller of your brand’s narrative. Incorporating it in your videos instills a sense of familiarity and credibility amongst viewers, fortifying your brand’s image every step of the way
Contents
Why Your Videos Need a Logo Overlay
Adding a logo to your videos goes beyond making them look attractive – it’s a potent marketing strategy that significantly boosts your brand’s visibility, differentiates you from competitors, and builds trust with your audience. Statistics show that branded videos get shared 86% more than those without branding. By incorporating a logo overlay into your video content, you constantly remind viewers of the source of the creative content they enjoy, reinforcing your brand identity in a subtle yet powerful way.
Here’s another aspect not to overlook: incorporating a logo into your videos doesn’t only serve to promote your brand but also to safeguard it. Given the likelihood of your content being shared across various platforms by viewers, your logo effectively functions as a video watermark on PC, ensuring your brand retains its rightful acknowledgment regardless of where the content is circulated.
The Challenges of Adding Logos to Videos on PC
Adding a logo to your video can seem daunting, especially if you’re a novice video creator. You might know that a logo overlay is essential, but the technical aspects of video editing can appear complicated. You may have faced issues such as:
- Choosing the right software that provides the necessary features and is compatible with your PC;
- Understanding the editing tools and customizing your logo’s placement, size, and opacity;
- Adding creative animation effects or transitions to blend your logo seamlessly into your video;
- Exporting your final video in a high-quality format that retains your branding.
If these challenges sound familiar, your knight in shining armor is here: Animotica. This user-friendly video editor offers a solution for each problem, helping you master the art of adding logos to videos on PC.
How to Add Logo to Video on Windows
For any aspiring video creator or marketer, learning how to embed a logo into your video properly can drastically elevate your content’s overall quality and professionalism. So, let’s dive into the specifics of effortlessly adding a logo to your videos on a Windows PC using Animotica, which provides a seamless interface and powerful editing features.
Step 1: Launch Animotica and Create a New Project
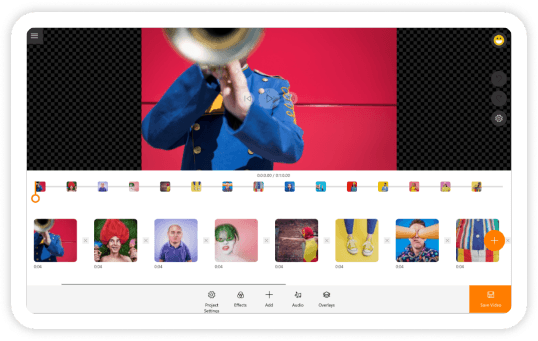
When you open Animotica, you’re greeted with a clean, intuitive interface designed with user-friendliness and convenience. All you need to get started is to click the ‘+ New Project’ button in the middle of the welcome screen.

Ensure you’re starting fresh, which will provide a blank canvas to work your magic on. As soon as you do this, your new project will be loaded, ready to receive your fantastic video clips.
Remember: You can return to the main screen anytime by clicking on the Animotica logo in the top left corner. This is a helpful shortcut to start a new project or access saved ones.
Step 2: Upload Your Video Clips
Once you have set up a new project in Animotica, it’s time to bring your video clips into the mix. This process is as easy as pie, thanks to Animotica’s user-friendly interface.

- Click on the ‘Add Video/Photo Clip’ button at the bottom of your project window. This should bring up a dialog box.
- Navigate to the location of your video clips on your PC. You can select multiple clips simultaneously by holding the Control key (Ctrl) while clicking on each file.
- With your clips selected, click the ‘Open’ button. Your selected clips will appear in your project timeline, ready for editing.
Remember, the timeline is your creative playground. It’s where you assemble your clips, adjust their arrangement, and add all your unique branding touches – like your logo overlay.
Pro Tip: Organize your video clips in a dedicated folder before starting your project to make editing smoother and faster. This will allow you to find and import your clips quickly.
With your video clips successfully imported into Animotica, you’re well on your way to crafting a video that speaks volumes about your brand. So, let’s move on to adding that all-important logo.
Step 3: Add a Photo Overlays of Your Logo
Once you’ve successfully imported your video clips, the next big step is to integrate your brand logo. Adding a photo overlay of your logo onto the video is a simple process when using the Animotica video editor.

- On the editing screen, look towards the right sidebar and find an ‘Add‘ button. From the drop-down menu, select ‘Overlay‘.
- You’ll be presented with a couple of options. Click ‘Photo‘ to add an image from your files.
- Navigate to where you’ve stored your logo file, select it, and click ‘Open.’
Note: For optimal results, your logo should ideally be in PNG format with a transparent background. This ensures it seamlessly blends with your video content without unsightly color blocks.

There you have it! Your logo is now a part of your video clip. However, it’s not yet perfect. You must adjust its position, size, and transparency to create a professional-looking video watermark on your PC. All that remains is customizing it to your specific requirements!
Step 4: Adjust the Size, Placement, and Opacity
Once your logo is in place, it’s time to mold it to fit your video perfectly. In Animotica, adjusting your logo’s size, position, and opacity is a breeze. Let’s dive into how you can do this with ease.
Size: Depending on the visual impact you wish to create, you may want to resize your logo. To adjust the size, click on your logo on the video preview. A bounding box with resizing handles will appear around it. Drag the handles to get your desired length.

Placement: Where your logo sits on your video can either enhance or detract from your content. To move your logo, click and drag it around the video preview area until it’s where you want it.

Opacity: Adjusting the opacity of your logo decides how see-through it is. If you want your logo to blend in with the video while still being visible, you can lower its opacity. Select your logo, go to the ‘Opacity’ slider in the editor panel, and adjust as desired.

- Tip 1: A less opaque logo blends better with the video but stands out less.
- Tip 2: Logos typically go in the bottom-right corner of the video, but the top-right and top-left corners are also common spots.
- Tip 3: Keep your logo’s size consistent across your videos for a more professional look.
By optimizing the size, placement, and opacity of your logo in Animotica, you can ensure that your brand stands out while not distracting the audience from your video content. The great thing about Animotica is that it allows you to see these changes in real-time and experiment until you find the perfect settings for your branding!
Step 5: Export Your Video
Once you’ve meticulously marked your brand identity on your video with a logo using Animotica’s user-friendly interface, your masterly crafted video is ready for the world to see. However, before sharing and distributing your video, export it to your computer. Here’s how you do it:
- Click on ‘Export Video’ at the bottom right of the screen. This will present you with several options.

- Select your desired quality and format. Animotica offers a range of options, including HD and full HD, and supports the most common formats, like .mp4. Pick what suits your needs best.

- Click on ‘Save As’ and choose your saving location.
Animotica then works magic, exporting your video with the professionally added logo overlay. The time taken for this can vary depending on the size and quality of your video. But rest assured, the result will be a polished, branded video ready for your audience to engage.
Remember, video file formats and quality are vital in the final product. Therefore, choosing the right settings that align with your objectives is essential. For example, choose the highest resolution available if your target is high-quality YouTube content. Alternatively, reduce video quality slightly if storage space or upload speed is a concern.
5 Best Practices for Adding a Logo to a Video
Adding a logo to a video is more than simply sticking your brand’s symbol onto the footage; fine art is involved to ensure the outcome is proficient and impressively heightens your brand’s image. To help you master this skill, consider the following fundamental factors:
- Logo Placement: Your logo’s location on the screen can affect its visibility and the overall aesthetics of the video. While the lower right corner is the traditional choice, there’s room for creativity depending on your video’s content. You might consider the top corners or the center, depending on the scenes of the video. Ensure the logo’s location is consistent across different videos to solidify your brand’s visual identity.
- Size of the Logo: The dimensions of your logo should strike a balance between visibility and subtlety. It should be seen, yet it shouldn’t eclipse the video content. Animotica’s intuitive resizing tool allows you to easily manipulate your logo’s size to find the sweet spot.
- Visibility – Opacity: Play with the transparency of your logo to make it less intrusive while ensuring it’s visible enough. A semi-transparent logo blends well with the ongoing content without distracting the viewers.
- Intro Animation: If it aligns with your brand’s personality and the video type, consider introducing your logo with an animation. An engaging entrance could draw interest and add a touch of class to your video. Animotica provides various animation effects and transitions that can make your logo dynamically enjoyable.
- Quality of the Logo: Always use a high-quality version of your logo. A pixelated or blurry logo can tarnish your brand’s impression and diminish the overall quality of your video presentation.
Incorporating these key aspects when adding logos to videos on a PC will promote a professional appearance and help forge a stronger connection with your audience. Remember, video editing is a blend of art and logic — so keep experimenting till you find what works best for your brand via monitoring viewer engagement and feedback.
Wrapping Up
With Animotica, adding logos to videos on your PC is simpler than ever. A professional logo overlay can elevate your brand’s presence in video content. Animotica allows customization of logo size and placement and the addition of animation and transition effects for a unique look and feel.
Remember, practice makes perfect. Continued use of Animotica will refine your skill in adding logos to your videos and simplify the process.
A well-branded, engaging video can captivate viewers and reinforce your brand identity. As you learn from the tips provided in this guide and gain experience in video editing, the available support from the Animotica community is always on hand.
Level up your video content today. Try Animotica for free and discover the ease of adding professional logos to your videos.
FAQ
What is the best software to add a logo or watermark to a video on PC?
If you’re seeking an optimal tool to add a logo or watermark to a video on a PC, Animotica is among the top choices. Easy to navigate and brimming with practical features, this video editor offers robust solutions to anyone trying to step up their video content with a professional touch.
Remember, the best tools are the ones that align with your needs. Opt for software that offers simplicity and suits your proficiency level, budget, and unique requirements.
Here are a few reasons why Animotica could be your best bet:
- User-friendly Interface: Designed for users of all experience levels, Animotica’s interface is easy to use and navigate. Its intuitively designed platform makes video editing stress-free, be it for beginners or experienced video creators.
- Versatile Functionality: Whether you wish to add a static logo overlay or animate it with transitions, Animotica delivers. You can adjust logo size, placement, and opacity with a few clicks, blend logos seamlessly into the video, or make them stand out with animated effects.
- Combination of Features: Animotica covers a range of editing needs beyond adding logos, offering features like reversing a video, animated overlays, 3D LUT filters, Glitch and Old TV effects, and other special effects. Too many cooks might spoil the broth, but as our experience suggests, extra features in a video editor add to the flavor!
This winning combination of usability, functionality, and support makes Animotica the preferred video editor for many creators and small businesses aiming for unforgettable videos.
Can I add animation effects and transitions to my logo in Animotica?
Absolutely! With Animotica, you do not just add a logo to a video; it goes beyond that. It allows you to bring your logo to life by animating it with various special effects and transitions, making your video content engaging and visually stunning. The process is straightforward and user-friendly, catering to beginners and more experienced users.
You may be wondering: How do I animate a logo in Animotica? To help with that, we’ve compiled a comprehensive step-by-step guide on how to animate a logo in 4 easy steps. This guide will walk you through the entire process, providing clear instructions and helpful tips, making logo animation a breeze.
The versatility and power of Animotica make it an excellent choice for anyone who wishes to elevate their video content, infusing it with professional branding elements like animated logos. So, what are you waiting for? Dive into the exciting world of video logo animation with Animotica now!


