Today’s guide will show you how to make tutorial videos on Windows 10/11.
Whether you’re a solopreneur looking to sell an online course, a company that wants to show customers (and prospects) how to use a product, or a school that wants to engage students more productively, stats have revealed that tutorial videos are giving the best results in the last few years.
A recent study by TechSmith reported that 53% of people watch at least two tutorial videos per week. This is mind-blowing because, as of 2013, only 17.4% of people reported watching two or more tutorial videos per week!
That said, if you aren’t making tutorial videos already, the best time to start is NOW!
We will not only arm you with the skills to make tutorial videos on Windows 10 and 11, but we’ll also provide you with pro tips to help you generate the best results possible!
Let’s go!
Contents
Types of Tutorial Videos Based on Production Style
Usually, you’ll find different blogs listing several types of instructional videos. But you’ll also notice that all these classes fall into three major categories:
- Talking Head
- Screen Recording (screencast)
- Animation Videos
Let’s quickly go over them!
Talking Head Video
Talking head is perhaps the most popular style of production for tutorial videos. It features an instructor, or a group of instructors, speaking directly to their audience through a camera.
Talking head videos are mostly supported by other forms of videos, especially screen recording because the instructor would need to show real examples and steps instead of just giving vague speeches for several minutes.
Screen Recording
Screen recording (or screencast) features only an instructor’s voice while showing a computer screen. The aim is to show, in real-time, steps and examples, with respect to the subject or product being talked about. Slidecasts also fall into this category, where an instructor records and displays presentation slides while speaking in the background.
The video above, by Animotica, is a practical example of a screencast type of tutorial video.
You can also spice your screen recording up by adding captions, stock footage, etc., as we’ll show soon enough!
Animation Videos
Animation video technique involves using animations to educate viewers. This category covers whiteboard animation, 2D and 3D animations, animated typography, and more.
You only need to have your voiceover on the video while making animations that illustrate your points.
Tools Needed for Tutorial Videos
To make great tutorial videos, you do not need a crazy amount of equipment. In this section, we will show you the fundamental tools you’ll need, along with some ‘optionals’ in case you can afford them.
A Camera

A camera is especially useful if you’re making talking head videos. It is advisable to invest in high-quality cameras. But for starters, don’t look down on your smartphone! With good technique, you can film pro-level videos with just your smartphone.
A Video Editor

Whether you filmed with a pro camera or a smartphone, your video will be ten times better with a little bit of post-production. Editing your videos will make them more digestible and fun to watch.
There are several awesome video editors on the internet, but our favorite is Animotica!
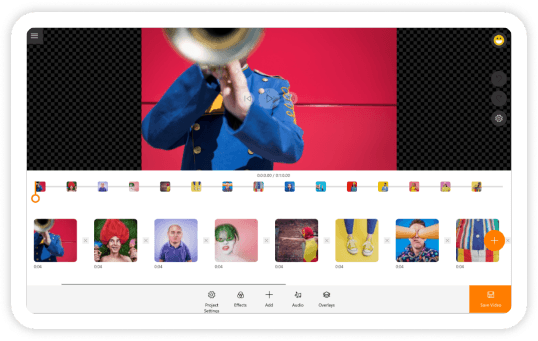
Animotica stands out because apart from its beautiful interface, it is very easy to use and packs a lot of features that can take your videos from zero to 100 in just a few clicks!
To make your tutorial videos more exciting to watch, you can add captions, transitions, special effects, etc., and Animotica makes it all easy to do!
You can start for free by clicking the button below.
Important Note: Animotica is free for educational institutions. To get access to this offer, click here.
A Screen Recorder

For screencast videos, you will need a screen recorder that can capture your screen and your voice in high quality. Again, Animotica has the right tool for that!
ScreenMix gives you the flexibility to choose the video quality that’s right for you. It also gives you control over your privacy. Thus, you can choose what parts of your screen you’d like to display.

Ultimately, ScreenMix is superb for game recording, webcam sessions, collaboration, and e-learning!
If you’ve already installed Animotica, you can find the screen recorder in the Quick Tools section.

Alternatively, you can click the button below to get it from Microsoft Store.
An Animation Tool

If you’re looking to make animation videos, then you’d need an animation video maker. There are several tools in the market. But we’ll list the most popular ones here.
- Moovly
- PowToon
- Wideo
- Voki
- Animaker
The following tools are nice-to-haves, but they won’t cause any serious problems if you don’t have them.
A Tripod Stand

A tripod stand helps to keep your camera stable, so that your videos will look more professional. If you don’t have the funds for a tripod stand, though, you can improvise by keeping your camera on a stable platform or propping it against a stack of books!
Lighting Equipment

Lighting equipment is excellent because they not only make your video more aesthetic, they also make you look a lot nicer on camera.
If you can’t afford lighting equipment, you can simply film in a well-lit room or under direct, natural sunlight.
Here’s a guide on how to get the best lighting for your videos.
A Microphone

A microphone is a solid investment because sometimes, when you’re out in the open, your camera or smartphone can pick up random sounds and mess with your audio.
If you can’t afford a high-quality microphone, one great hack would be using a pair of wired earphones or simply using a second smartphone to record your voice. Afterward, you can easily import the recorded audio into your video using Animotica.
A Teleprompter

A teleprompter is a tool that discretely displays a speaker’s scripts behind a camera in such a way that the speaker can read out the scripts while naturally looking at the camera.
It makes work a lot easier for anyone talking in front of a camera. But if you can’t afford a teleprompter, you can simply memorize your script. Here’s a guide on how to use a teleprompter.
How to Make Tutorial Videos on Windows 10/11
Now that we’ve gotten the tools and types of tutorial videos sorted out, it’s time to get into how to actually make them.
Let’s proceed!
Getting Your Video Ready
For talking head videos, you can film yourself in a quiet, well-lit environment using a smartphone or a professional camera.
For screencasts, you can use ScreenMix to record your screen throughout your tutorial session.
Having gotten your video content ready, the next thing would be to polish it up. Let’s get to it!
Step 1: Install and Launch Animotica
It takes only a couple of minutes to install Animotica on your PC. If you haven’t installed it already, hit the button below to proceed.
Once you’ve installed the app, launch it and click on New Project. This will take you to a new window, where you can start working on your video.

Step 2: Upload Your Video
Start by clicking on Add Video/Photo Clips. From the pop-up drawer, select Add Video or Photo Clips.

Now, you can navigate where you’ve stored your video on your PC, select, and upload it.
If you haven’t transferred your video files to your PC, here’s a guide on how to transfer files to your PC.
Step 3: Edit your Video
At this point, there are many things you can do to make your video look ten times better. We have already created full guides on all of them, so we can just link to them instead of scratching the surface.
Some of the awesome things you can do include:
- Animated captions
- Trimming
- Splitting
- Transitions
- Special effects
- Voiceovers
- GIFs and Stickers
- Color Grading and 3D LUTs, etc.
Feel free to check them out and play around with the video editor. It’s easier than you think!
5 Golden Tips for Making the Best Tutorial Videos
In a world of fierce competition, it isn’t enough to just have the skills. What makes you stand out is your ability to use your skills differently.
In this section, we will arm you with actionable pro tips to help you make tutorial videos on Windows faster, smarter, and more productively.
Let’s get into it!
Use a Script
This is a no-brainer. Scripting your video will make the video creation process a lot less daunting for you. With a script, you’ll have a defined plan for your tutorial videos, and you won’t miss out on important information.
Check out our guide on video script writing.
What’s the best length for Tutorial Videos?
Everybody wants a concise video that has all the information we need. But, sometimes 3 minutes may not be enough to cover all the information.

The infographic above shows that the viewers chose the optimal length for short videos to be 3-4 minutes, while the best length for long videos is 10-19 minutes.
If your video is about to cross the 20-minute mark, break it into sections and be sure to make each section engaging enough to make your viewers willing to watch the next one.
Create a Table of Content with Time codes
In the world of tutorial videos, user experience is crucial. If your video contains plenty of information that’s not useful to your viewers, they will click out of the video.
So, to reduce the chance of this happening, you can create a table of content for your video and include time codes/ timestamps for each section in your video description. Also, let the viewers know you included the timestamps. That way, they can easily navigate to any information they want to access.
If your videos are that easy to watch, they will come back for more.
Keep SEO in Mind
A lot of people just create tutorial videos and leave everything in the hands of the algorithm. But if you put in a little more effort, your content will stand out, and you will be more visible to new viewers.

You can start by doing some keyword research to know what people are searching for. Then you can also add your keywords to the video title and description. Tags and captions are also nice-to-haves if you want your video to reach more viewers.

Make Use of Analytical Tools
Analytics help you know how your viewers behave around your videos. You get to know where they click off and even know what videos have the best viewer retention.
That way, you’ll know where to improve and even plan your videos better.
Most popular platforms like YouTube, Vimeo, Udemy, etc., provide basic analytical tools to help you improve your videos.
FAQ
How do you start a tutorial video?
To start a tutorial video, it is crucial to plan and prepare effectively. Begin by identifying the specific topic you want to teach and conducting thorough research to gather all necessary information.
Create a clear outline and write a script that outlines the key points and instructions. Then, proceed to record the video using proper equipment and lighting.
After recording, edit the video to enhance its quality and add finishing touches such as background music or graphics. Finally, review the video for any errors or inconsistencies before publishing it and promoting it through various channels to reach your target audience.
How to make a tutorial video for free?
Making a tutorial video without spending money is achievable. You can utilize screen recording tools like ScreenMix or the in-built Game Bar on Windows 10/11 to capture your screen without additional software costs.
Free video editing software such as Animotica, Shotcut, or OpenShot provide basic editing functionalities to trim, add text, and transitions. Enhance your video’s visual appeal by incorporating free stock footage and images from platforms like Pexels or Pixabay.
For audio, you can find free music and sound effects on resources like YouTube Audio Library or FreeSound. Remember to review the terms of use for these tools and resources to ensure compliance with licensing restrictions.
What software do you use to make tutorial videos?
There are several software options for creating tutorial videos on Windows 10/11.
Animotica is a user-friendly video editing software designed specifically for Windows, offering features like trimming, text overlays, and transitions.
ScreenMix is a versatile screen recording and video editing software suitable for Windows users, providing tools for capturing screens and integration with Animotica with the ability to edit recordings.
Additionally, Windows 10/11 users can utilize the built-in screen recording tool called Game Bar for basic tutorial videos without the need for additional software.
Explore these options and consider the features that best align with your needs and budget.
How do you make an effective tutorial video?
Crafting an effective tutorial video requires careful planning and execution. Here are some valuable insights to consider when creating your tutorial video:
- Begin with a clear introduction that outlines the purpose and goals of the tutorial.
- Maintain focus by providing concise and easily understandable instructions, breaking down complex processes into smaller, manageable steps.
- Utilize visuals such as screen recordings and text overlays to demonstrate the steps effectively.
- Engage with your audience by encouraging interaction, using a conversational tone, and incorporating interactive elements.
- Pay attention to audio and video quality to ensure a professional appearance, avoiding distractions and maintaining clarity.
- Edit the video to remove errors and enhance visual appeal with appropriate transitions and graphics.
- Conclude the video with a summary and a call-to-action, inviting viewers to provide feedback and further engage with your content.
Wrapping Up
As already established, it is easy to make tutorial videos on Windows 10/11. Millions of people are using this as a medium to connect with prospects and grow their businesses.
However, it is always important to put in the extra work to make your content stand out from the crowd. We hope that this guide gave you the value you came for!
Feel free to drop your questions and recommendations.
Cheers!
