To make your video rock, you will need a video editor with transitions and fantastic video clips to which you want to add transition effects. But how to do that in Windows 10/11? Technically, you can add a tremendous effect in 6 simple steps if you toss in downloading and installing the app itself.
Before we start banging out the steps, let’s quickly run through what a transition effect is and why it’s crucial in video editing.
Contents
What is a Video Transition Effect?
A transition effect is a tool within your video editor that adds an element of movement or change to connect your slides. For instance, imagine you’re creating a project that shifts from an indoor shot to a scenic outdoor view. A simple cut might appear jarring, but a seamless transition can guide the viewer comfortably to the new setting. This enhances a video’s visual appeal and storytelling, making it appear more professional and engaging.
When creating or editing a project using a video editor with transitions, you usually make your slides by adding video clips, images, color clips, etc. These slides are displayed one after the other in your preview screen in what can be called an essential transition. However, basic transitions make your videos look more bland than simple, lacking in sophistication and creativity.
This is where transition effects for videos come in. Video editors use transition effects to make your clips, images, and videos move more creatively from one element to another.
Why are Seamless Transitions Important in Video Editing?
In the world of professional video editing, seamless transitions are essential. Like a smooth-flowing road guiding your viewers from scene to scene, seamless transitions in video editing help create an engaging and easy-to-follow narrative.
So, why are these transitions so vital to your videos?
- They enable continuous storytelling: People naturally crave continuity in stories. Seamless transitions provide this sense of flow, connecting various segments of your video and aiding in a compelling storytelling experience.
- They exude professionalism and quality: Rough cuts can instantly lower the perceived quality of your video, making it seem unprofessional. On the other hand, carefully executed seamless transitions can significantly elevate your content’s quality and project a professional image.
- They help control pacing: You can efficiently manage your video’s rhythm and timer with seamless transitions. Whether it’s rapid cuts for action sequences or slow fades to build tension, transitions are instrumental in setting the mood for your video.
- They enhance visual appeal: Beyond their functional role in storytelling, seamless transitions can make your video more visually captivating by introducing unique and creative elements.
In short, transitions in video editing aren’t just ornamental. They’re vital to the perception of your video and how it unfolds to your viewers. Wielded correctly, seamless transitions can dramatically improve your video’s appeal, creating a more engaging and professional visual narrative. Remember – they should always serve your story, not distract from it.
How to Add a Video Transition on Windows
Step 1: Pick Software
If you’re embarking on your video editing journey with Windows, don’t worry! Numerous movie makers and video editors can browse and select from the Microsoft Store on your PC or tablet. Mac, iOS, and Android users can also seek quality video editing software in their respective app stores. Remember that costs and available support might fluctuate across platforms while offering comparable features. You might find our selection helpful guide for picking what’s best for you based on reviews and ratings. However, for dramatic simplicity, we’ll focus on Animotica, an intuitive and free-for-use video editor for Windows equipped with transition effects. You can directly download it from the Microsoft Store.
Alternatively, you can search for it or any other video editor on the Microsoft Store.
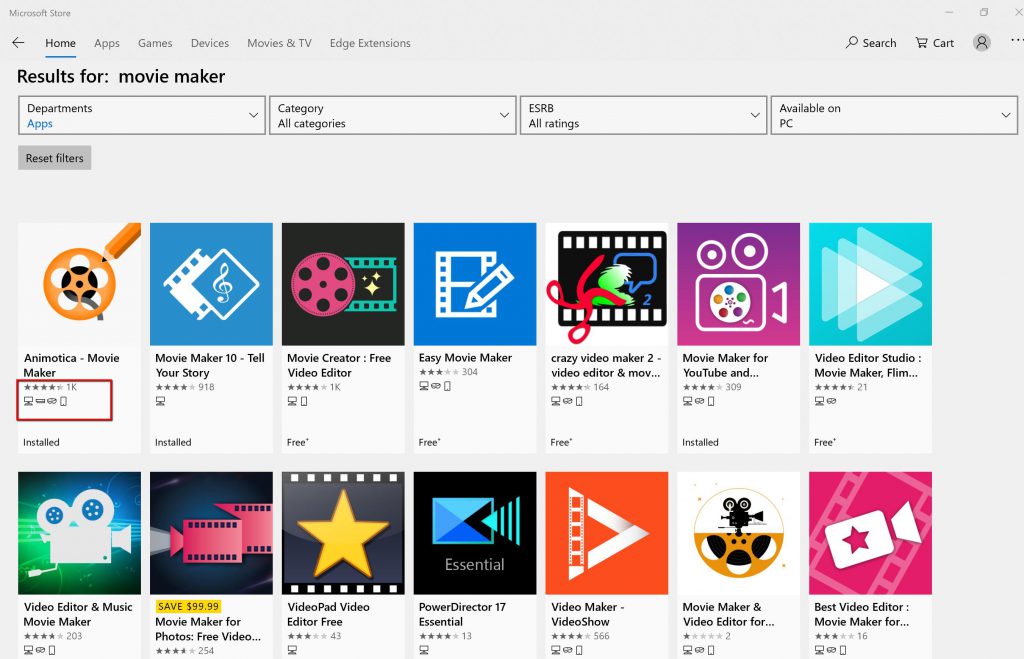

Download and install the application on your PC, then launch it.
Step 2: Kick-Start Your First Video Project
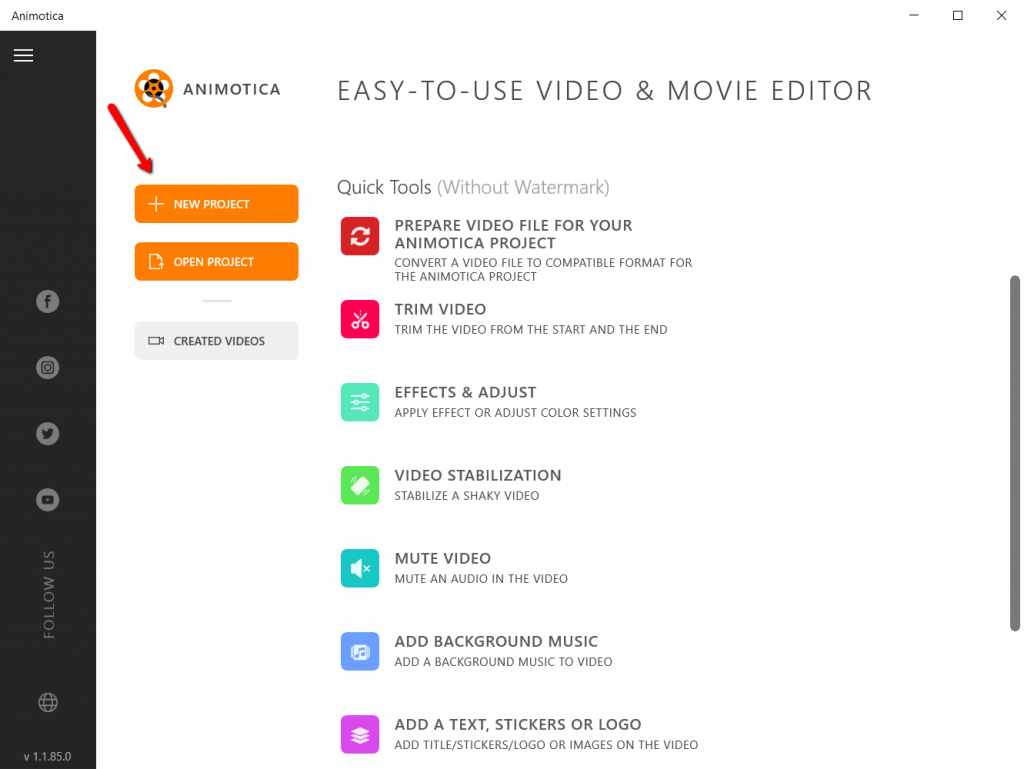

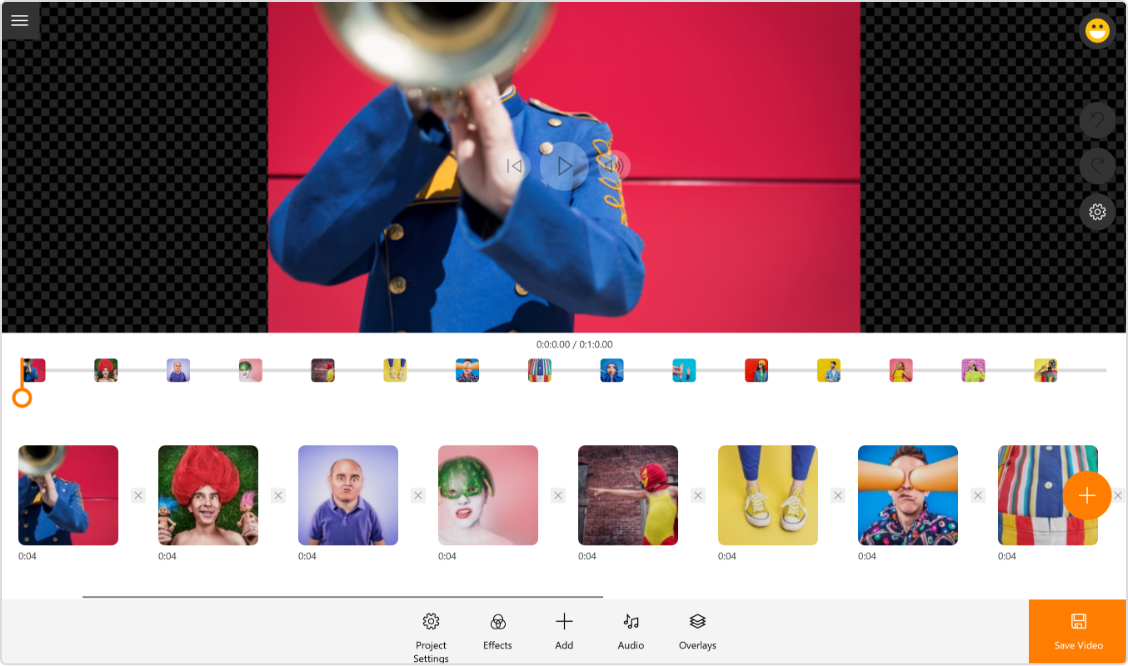
Launch the app, and click on “New Project”. You can also access quick tools from the first screen if you need to make other changes to your video first.
By default, your video project will have the aspect ratio perfect for YouTube videos. If you want different dimensions for your video, choose the aspect ratio that fits your needs: widescreen for YouTube, vertical for Instagram, TikTok and YouTube Shorts or pick the dimensions. Name your project.
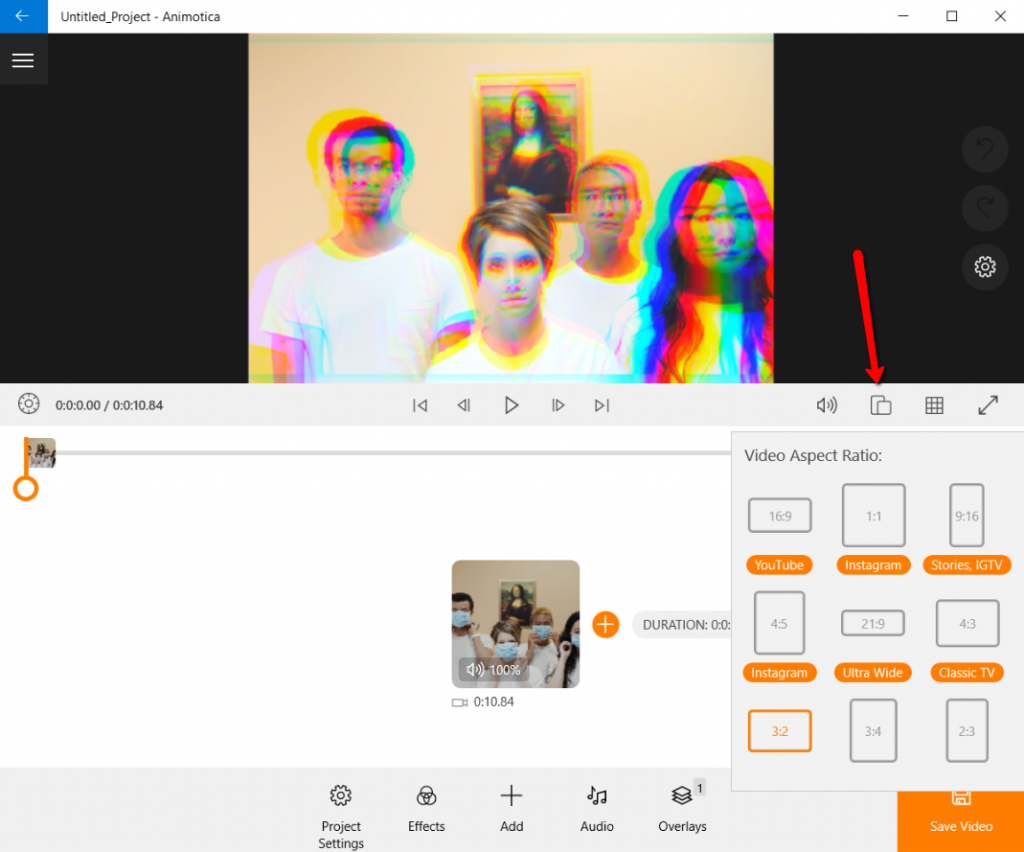

Step 3: Add Content
Add a couple of clips you’ll be transitioning through. If you don’t have enough video or audio content to add, we recommend you check these websites with royalty-free content.


If you have one file, you need to split it into a few pieces to add transitions between them.
Note that you need to provide access to your files for the app.
Step 4: Pick the Place for a Video Transition
If you want to apply the same transition effect to all your files, navigate to Project Settings.
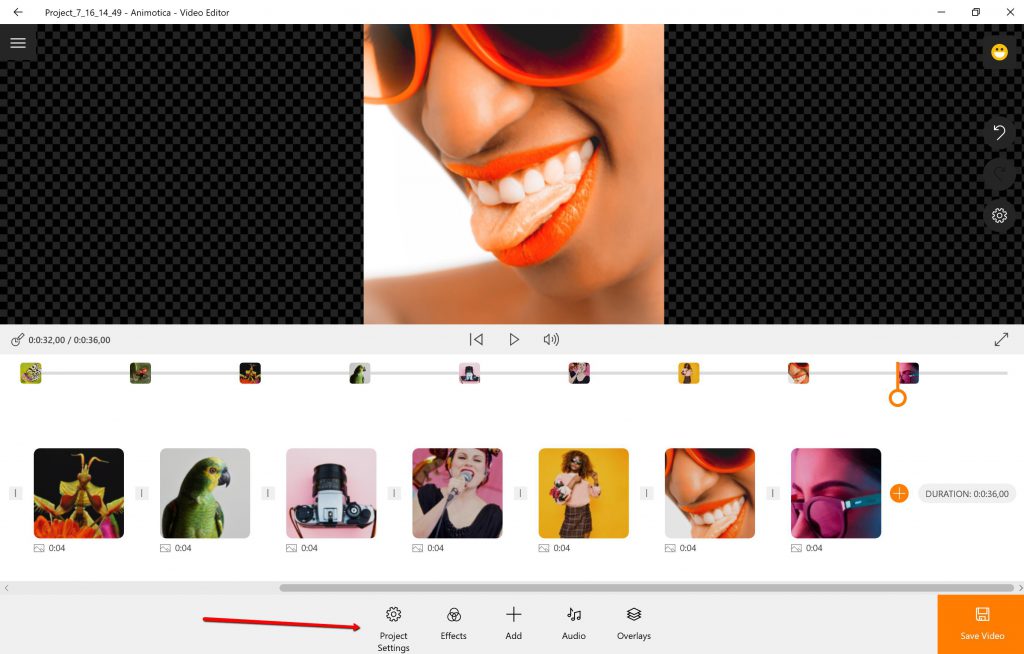

Select one of a variety of transitions to apply to all your clips, and it will automatically appear between them.
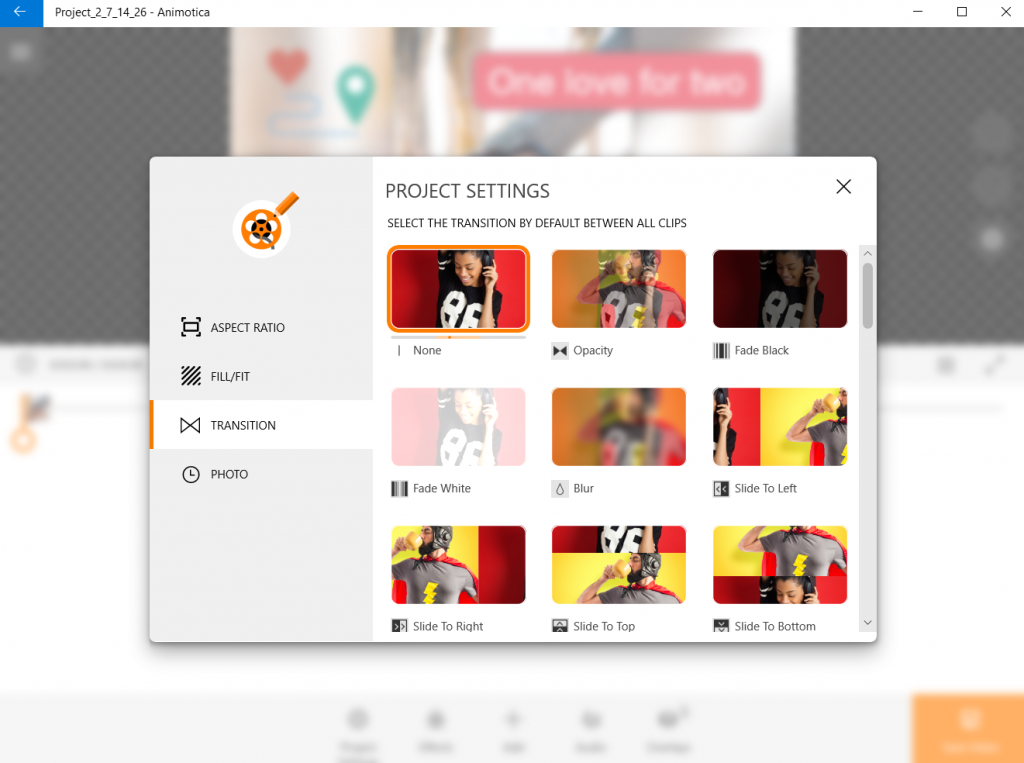

If you want to add a video transition between two slides, click the square icon between them.
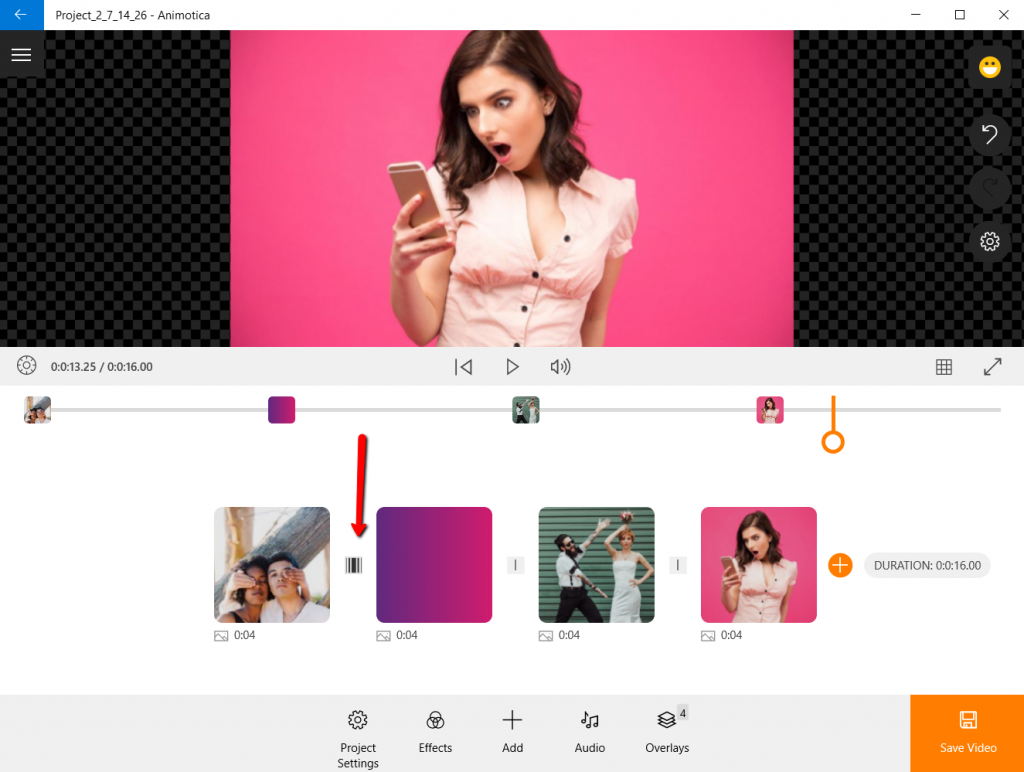

Step 5: Pick the Best Video Transition Option
You’ll be presented with a list of fantastic options and a preview. Pick the transition that fits your needs most.
Also, you can regulate the transition effect’s duration on this screen.
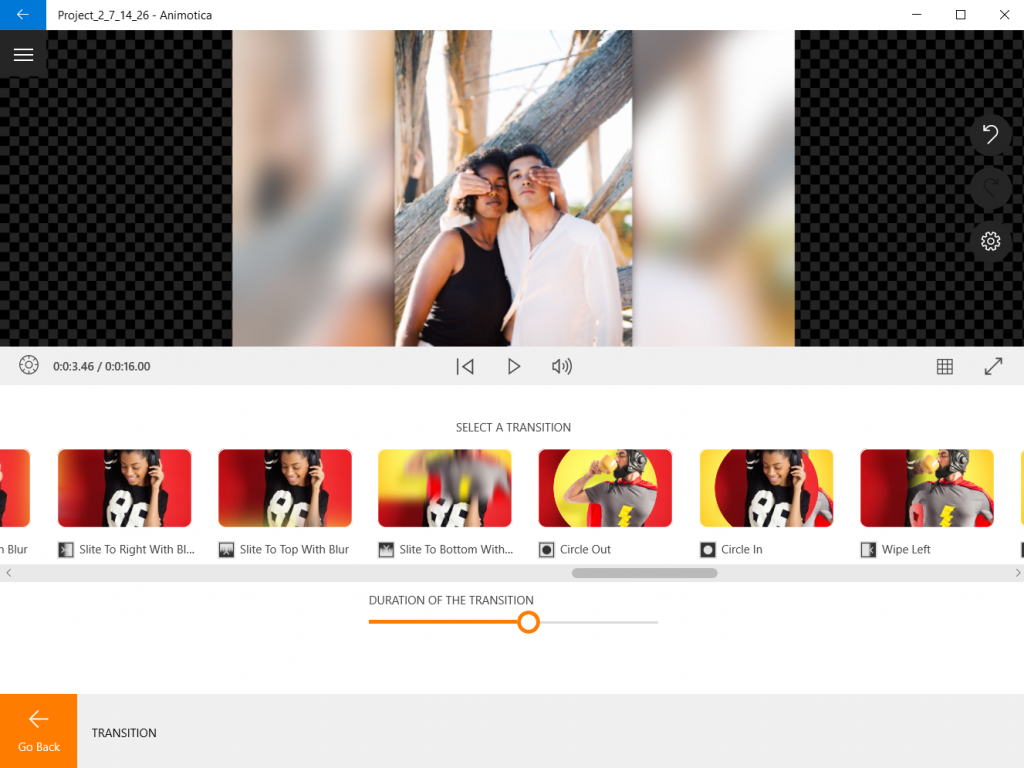

Make sure to adjust a proper transition speed as well (Duration of the Transition).
Step 6: Save your Video
When you’re done setting your transition effects, you can go ahead and save your video.
Click on Save Video.


This will lead you to the Export Video window, where you’ll see some post-editing options, such as Select a Video Resolution and Bitrate.
By default, Animotica sets your video resolution at 720p, this is the best balance between quality and size, and is an excellent fit for YouTube. You can go for higher quality, up to 1080p and 4k!
However, note that the higher you go, the larger the file size, leading to slower export time.
The same thing applies to Bitrate. So, you might be better off leaving everything at the default setting.
Next step: Hit Save As. This shows you a window for inputting your desired filename. Enter your filename and hit Save.
At this point, you can relax and let Animotica render your project!


That’s it. You are done.
How to Add a Transition to Your Video on PC [Video Tutorial]
If you’re searching for better visualization, check out this brief guide on how to add a transition effect to your video using Animotica.
Video Guide on How to Add Transition Between Your Clips
Making a professional transition to high-quality video content is a bit more complex. It takes a fair amount of skill and experience because aside from knowing how to add an effect, you need to be sure of the why and the where.
Video Guide on How to Add the Same Transition Between All Your Clips
Without further ado, here is a handful of our favorite tips for making a seamless transition like a pro.
3 Must-Know Video Transition Tips
Don’t Overthink It
The less ornate approach in video editing often lends itself well to professionalism. Too many special effects can make a video seem cheap – or even worse like you’re trying too hard.
As a video editor, your main aim is not to dazzle viewers with your skills. Instead, you’re trying to deliver a straightforward, compelling story within your video. Here’s a handy guideline to consider:
- In 90% of cases, fading to black is all you need.
- For the remaining 10%, a cross-dissolve technique works perfectly.
Of course, that’s not to say you should avoid daring or flashy effects altogether. However, they should be thoughtfully implemented when there’s a substantial artistic reason.
Don’t Overuse Transitions
As digital content creators in this age, it’s almost impossible to avoid using transitions. However, be wary of overdoing it, adding transitions simply because they look cool without further justification.
Let’s consider the optimal places to use transitions:
- To visualize time lapses in a speed loop
- To change from one scene to the next
- To shift the focus within the video
These are some typically best instances for transition utilization. Avoid applying transition effects unnecessarily.
Stay Creative
Having the basic rules set is essential. However, we are not here to stifle your creative spark.
Animotica is packed with a wealth of unique transition effects for a reason. They each serve a different purpose that you can discover. Feel free to experiment with them, feel their impact, and decide which suits your final work.
The way to do this is to upload multiple video clips or cut one into parts. This is achievable by splitting your video.
You’ll find that it’s pretty easy, at least technically. So go on and give it a shot.
FAQ
What Transitions are Included in Animotica?
Animotica provides a wealth of 51 transition effects to improve your video editing. With new effects frequently added, your choices are ever-expanding. And the best part? Each transition effect features an exclusive preview, showing exactly how it will appear in your video. Let’s delve into the range of transitions you can choose from.
Let’s explore some of the transitions at your disposal:
Every transition carries its own distinct visual and functional qualities. For instance, ‘Opacity’ offers a smooth dissolve effect, while the ‘Fade Black’ and ‘Fade White’ transitions allow slides to gracefully fade into a solid color as the new slide arrives. In a dynamic contrast, the ‘Blur’ transition lets the previous slide blur out as new content enters the scene.
Want to give your content a fun dynamic? Transitions such as ‘Slide To Right’ and ‘Slide To Left Over’ make your slides disappear in various directions. Add a spirited spin with the ‘Mixer’ transition, or create excitement with the ‘Bounce’ transition’s drop and bounce effect.
Transitions like ‘Wipe Left’, ‘Wipe Right’, ‘Wipe Top’, and ‘Wipe Bottom’ clear old slides off the screen, revealing new ones. Looking for a dramatic impact? Circle Out and Circle In transitions offer a dynamic blast effect, whereas the Liquid 100 transitions create a melting-away effect.
Other exciting transitions, like Directional Blur, Tiles H1 to H3, and Gate V1 to V4, offer movement blurring effects, sliding tiles effects, and a range of animation actions.
Want to surprise and impress your viewers? Check out the Twists, Mosaic, Morph, or Shake transition effects that can break your slides into pieces, mimic earthquake-like motion, or apply a unique wave-transforming effect. There is a transition to suit every video’s needs!
Please note that Animotica consistently introduces new transitions, meaning you may discover additional transition effects in the most recent version of the software.
Are Transition Effects Free in Animotica?
If you’re seeking more transition options and added features, consider upgrading to Animotica’s Light PRO, which is available for the cost of a coffee. It opens up a plethora of professional features, including more transitions. Interested? Start exploring today by installing the upgrade.
Have you still got questions, or are you seeking a more specific guide from our team of video editing experts? Join us on our social media pages. We welcome your comments and would be happy to engage with your insights!
You might also like:
The Easiest Way To Remove or Change The Background Of Your Video
How to Do Color Grading Using 3D LUT Effects?
40+ Tips from Successful Filmmakers to Beginners [Interview with PROs]





4 Comments
I want to order
Hi! You can download the app here https://microsoft.com/en-us/p/animotica-movie-maker/9nblggh6fw5v.
Is it true that only need to pay once a lifetime use?Urgent respond please. Thanks
Yes, you only pay once for lifetime use.